Technical expertise driving excellence.
Principle of capable tolerancing
Before describing the mechanisms of capable tolerancing, let’s review some facts:
Measurement is a cost.
These measurements must therefore be checked at a minimum and enhanced by providing a probabilistic view of the quality of the expected performance of the functions and statistical control of the risks of non-conforming assembly.
Control can only be optimised by linking functional parameters to user requirements (URS-DIR-FMEA). This means considering the severity of the functions and propagating it to the functional parameters. This justifies why not all parameters are controlled to the same level of statistical mastery.
Who can free themselves from the use of industrial statistics in their design and manufacturing processes?
Productions that control 100% of their functional conditions and parameters can effectively be satisfied with a worst-case calculation fir the functional conditions and a control within the Tolerance Range (TR) for the parameters. Certain sectors of the aeronautics, space or nuclear industries produce according to this logic. These industries do not benefit from the advantages of using statistics, so they are looking for processes that are as precise as possible. You only need to know the cost of an aircraft, for example, to understand that parts are very expensive.

What is the purpose of the Tolerance Interval?
The probability of making two strictly identical parts is zero, whatever the process used, since this will be the main source of fluctuation in the component characteristics. So, in order to declare a part compliant or non-compliant, production needs limits. As soon as production is no longer controlled at 100%, but by sampling, the use of statistics is imperative. In this context, the aim of production is to prove that the process capability is stable and capable of producing the required specifications. The normative statistical indicators for the long term are PP and Ppk.
What really is a Tolerance Range?
So a TR is linked to its long-term capability, and is defined by
![]()
This means that:
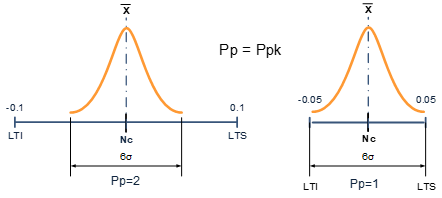
± 0.1 with a Pp=2 is the same writing than ± 0.05 with a Pp=1
Because their standard deviations are the same
![]()
A statistical TR is therefore a couple (TR; Pp); A tolerance Range only makes sense if it is associated with its capability.
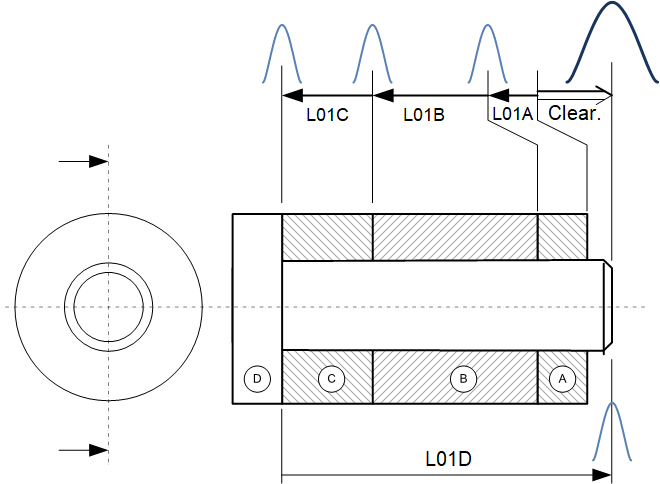
This couple enables the design office to calculate the statistical variation in functional conditions.
How ?
By the quadratic sum of the standard deviations (dispersion) associated with their confidence rate.
In the worst case we will have TRFC = ∑ (|ki|×TRdimensions)
In statistics we have:
![]()
The centered nominal of the functional condition is obtained by the following equation:
![]()
In statistics we have:
![]()
These formulas are only applicable in the context of the normal distribution. Unfortunately, this distribution rarely applies to a Tolerance Range for a defining parameter of a manufactured product.
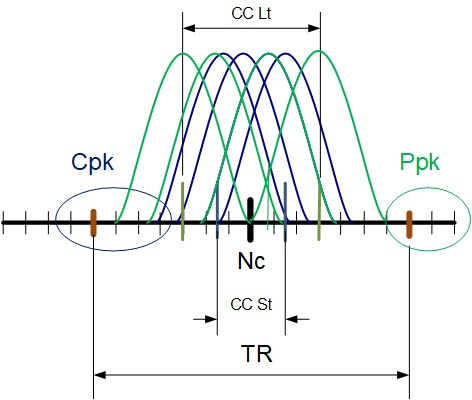
The aim of capable tolerancing is to take into account the fact that the observed short- and long-term average cannot be strictly equal to the Nominal centre of the dimension. This means that the excursion of the mean must be considered when calculating the target Pp.![]()
Short term centering is defined by the :

Short term centering is defined by the :
![]()
Calculating the statistical dispersion of an assembly requires the use of a complex statistical solver such as the Design Control Power software.
Let’s sum up:
- A TR must be associated to its capability
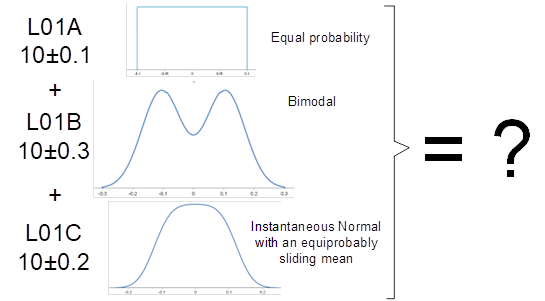
- The definition of a TR by the design office is not gaussian
- A software tool is needed to perform these calculations, as shown in the example where the ITs come from different processes and therefore have different statistical laws.
Be careful, asking for very precise centering to try and stay in a Gaussian position for assembly calculations has a major impact on tooling costs.
A TR is above all determined by the intrinsic dispersion of the process used and not by the designer’s imagination.
The use of statistical calculation in the predictive determination of the dispersion of functional targets enables significant gains on the cost and lead time of your products, as reasoning worst case and controlling at 100% generates prohibitive costs.
Implementing a Capable Tolerancing strategy, as we have seen in previous articles, enables you to know as early as possible the targets of the centered nominal values, thus reducing the risk of tooling modifications, especially in the case of multi-cavity tooling, a guaranteed saving of time and money.
The techniques we have developed are a logical extension of the HCPP standard. This means that observing process capability is essential for determining nominal values and controlling the Design Space (guaranteed functional areas of the product).
To implement a Capable Tolerancing policy in your company, you need to determine the expected values of the indicators and guarantee their consistency in the long and short term. We suggest that you work with us in this process to guarantee control of your costs, your lead times and, of course, your quality.


